
An introduction to Azure’s REST API and a walkthrough demo.
In todays post, we’re going to make a REST API call, both GET and PUT, towards an Azure API using an Azure API and a VS Code Extension called Thunder Client.
Thunder Client is a lightweight extension built for VS Code and is perfect for making a first API call, for those interested in more functionality and detail you can look at Postman or Insomnia.
But first, why use REST API calls when working with Public Cloud? 💭
The more popular public cloud infrastructure becomes the important it becomes to manage at scale, whilst GUI’s provide ample means to do so functionality can become limited and there are often problems that cannot be solved at scale through the portal without manual labour. We don’t like manual labour in the cloud, instead we automate! We can do so by making use of REST API’s. Learning to interact with resources via API requests, like IaC, can add another weapon to your arsenal when configuring, managing and creating cloud infrastructure. It is increasinly important to understand how to interact with REST API’s as this can allow you to interact with them on a more complex level; perhaps incorporating them into scripts, applications or pipelines. What makes REST APIs so powerful is their flexibility and scalability, you are able to return a variety of resource information, make changes to resources and even create resources, through what is actually a very simple process (the API does all the hard work). REST APIs aren’t limited to Azure, all major public cloud providers have their own functional API (AWS, Azure, Google Cloud & others!) and due to their standardised nature, the ability to interact with one can can help prepare you for the possibility your business goes multi-cloud!
Your first REST API Call 👋
Thunder Client
To get started with Thunder Client simply install the VS Code extension from the Extensions Marketplace and you’re set.
Service Principal Creation
To do this we can use the az cli to make a service principal with contributor permissions.
- First install the Azure CLI.
-
Then run this set of commands. Logging into your Azure account and creating the Service Principal role with Contributor permissions.
az login az ad sp create-for-rbac --role Contributor - Save the JSON output!
Creating our Azure Environment in Thunder Client
- In Thunder Client we will need to create a new Env which we will call Azure.
- Click on the Thunder Client VS Code Icon on the left hand side, select Env and then the 3 lines here you can create a new Environment.
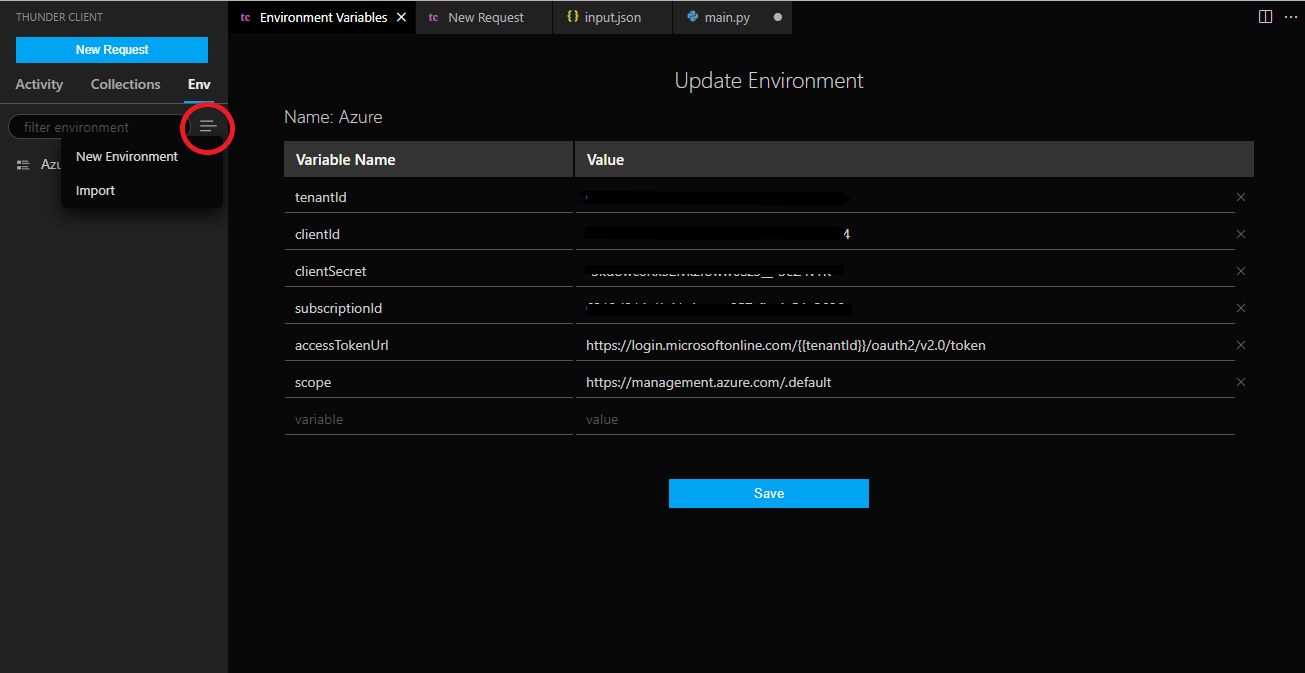
You will need to add the parameters listed below:
tenantId : <input your tenantId from the Service Principal you created>clientId : <input your clientId from the Service Principal you created>clientSecret: <input your clientSecret from the Service Principal you created>subscriptionId : <input your subscriptionId from the Service Principal you created>accessTokenURL : [https://login.microsoftonline.com/](https://login.microsoftonline.com/%7B%7BtenantId%7D)}/oauth2/v2.0/tokenscope : [https://management.azure.com/.default](https://management.azure.com/.default)
Once done, you can save and call it Azure or something similar.
Lets generate our OAuth 2.0 Token
-
In Thunder Client, click ‘New Request’
-
Select Auth, then head to OAuth 2.0 and ensure Grant Type is set to Client Credentials.
OAuth is THE standard in terms of cloud / identity. I concur that it’s rough to start with… Though do each flow via direct calls (without using an SDK) to get it “into your fingers”. Once you know what is going on, please only use an SDK, as with security… the slightest slip-up will haunt you!
Now you can input the following parameters to generate the token required for the API Request.
Grant Type: Client Credentials
Token Url: { {accessTokenUrl} }
Client ID: { {clientId} }
Client Secret: { {clientSecret} }
Scope : { {scope} }
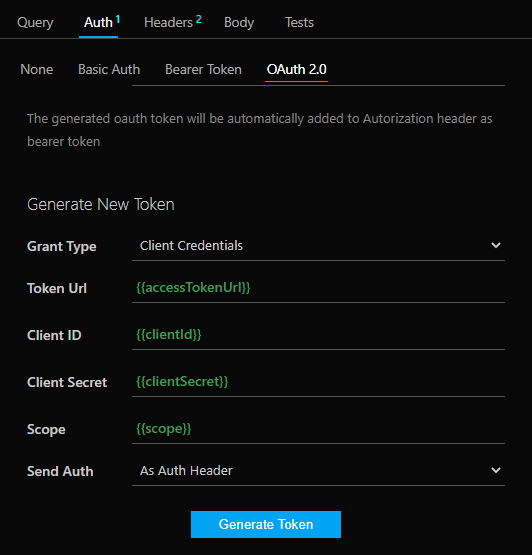
You should now be able to generate a token!
If you interested in the breakdown of the token you can paste it into here https://jwt.ms/ a JSON Web Token decoder and take a look!
Now lets call the API
- To find the REST API you wish to call, you can head to https://resources.azure.com/ or look take a look at the Microsoft documentation for each API operation.
- Next locate the API URI (Uniform Resource Idenifier) it should look something like this:
https://management.azure.com/subscriptions/<Subscription-ID>?api-version=2014-04-01 - With that URI you can enter it into the requests box. Depending on what API you choose you can change the request function. In this example case we’ll call the
GETList All Resources API - this will list all the resources within your given subscription and the data associated to each resource. - Set the request type to GET and populate the URI with the following, remember to swap out the actual subscription ID with the
{ {subscriptionID} }placeholderhttps://management.azure.com/subscriptions/{ {subscriptionId} }/resources -
Populate the query parameters with the appropriate api-version, this can change depending on the API you are calling (this can happen automatically if you copy the full request) in our case
api-version : 2021-04-01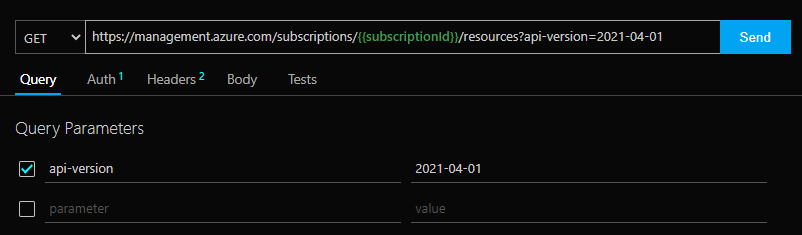
-
Should receive a successful 200 OK status code. If you receive anything else, take a look a these HTTP Status code requests.
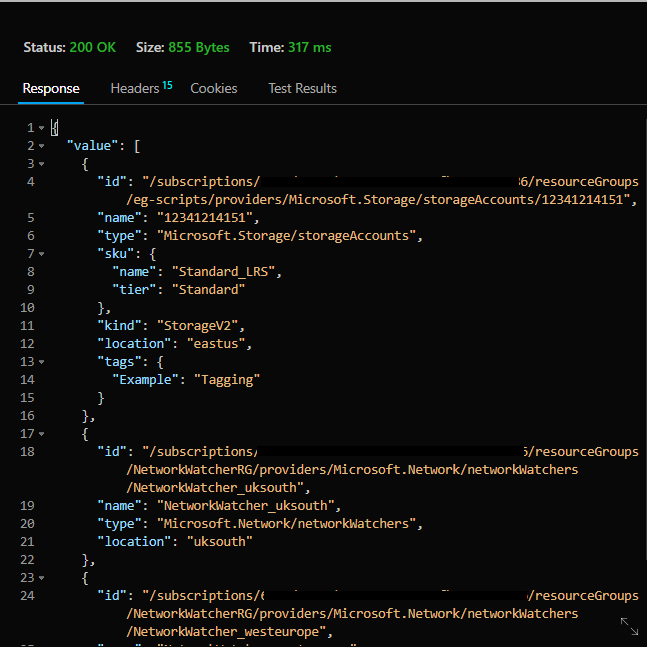
Great… Now what?
You have made your first API request! Well done. The returned response is in JSON Format, using this in conjuction with a script means you can generate all sorts of reports or filter out items with specific parameters and then make changes to them. The possibilities are endless.
Other interesting articles on REST API’s and Public Cloud.