
A how-to on deploying Kubernetes using k3s and Ansible to a Raspberry Pi cluster.
Kubernetes on Raspberry Pi
Building a home lab is often cited as the best way to experiment and learn, hands on, about some of the latest technologies and computing practices that are being deployed in the cloud space. A home lab being an environment in your own home where you can experiment safely, outside of work, by engaging in personal projects, for education and as a fun hobby. It gives you the opportunity to understand the infrastructure and processes behind a lot of the applications and services that are being run in the cloud. However, home labs do often come with a hefty price tag. Having recently purchased a Rapsberry Pi 4B, the possibility of building a small scale homelab out of these small, ARM powered, single-board computers perked my interest. After reading numerous community posts about how you can effectively cluster a number of Raspberry Pi’s together and manage them using Kubernetes, I found my perfect segue into building a Homelab.
Inspiration for this blog post from Jeff Geerling & Alex Ellis. I highly recommend you check out their blogs on all things Raspberry Pi.
Why build a cluster?
- Mainly, to explore the concept of prototyping, clustering and parallel computing using industry dominant technologies such as Kubernetes, Docker, Ansible and Terraform.
- Whilst cloud infrastructure offers less physical maintenance building in the cloud reduces the level of control you have over your own envionment. The ‘hands on’ approach associated with working on bare metal machines brings back that control, and provides a greater sense of achievement when you get things working as intended.
- A great way for newbies to get into building a homelab without the huge cost associated with setting one up. The concept of buying multiple computers, linking them to a network, managing the infrastructure (i.e. power, repairs, networking etc.), and then finding the space to store them was daunting.
- There are few differences betwen a Pi cluster and full scale enterprise production clusters. Aside from size and power, the underlying infrastructure, architecture, and design that goes into creating a cluster such as this is highly applicable even in modern enterprise environments. Companies like Bitscope even build out small scale supercomputer prototypes using Raspberry Pi’s to effectively demonstrate the infrastructure and management necessary for such a build.
- The Raspberry Pi itself is extremely versatile. The Pi’s used in the cluster can be reused for various different projects that don’t all resolve around building a cluster.
- It looks cool. The potential of adding more and more nodes, eventually building out something like the SuperPi seems like something that would be fun to explore.
Why Kubernetes (also known as “k8s” or “kube”)?
It is an open source container orchestration platform that automates many of the manual processes involved in deploying, managing and scaling containerized applications. Designed by Google, it is now maintained by the Cloud Native Computing Foundation. At only 6 years old Kubernetes has managed to establish itself year-on-year as one of the most consistently loved platforms; one of the reasons for this is Kubernetes movement towards infrastructure-as-data (IaD) and away from more traditional infrastructure-as-code (IaC). This lets admins express what should happen, rather than express precisely how to do it. The ability of Kubernetes to express resources in a simple YAML file makes it easier for DevOps engineers to fully express workloads without the need to write code in a programming language. IaD creates more transparency in version control and makes scalability easy; for example, you can simply alter the horizontal pod auto-scale value within the configuration file to determine the number of pods, the smallest deployable unit within k8s, that will be created in order to cater for differing levels of demand. Ricardo Aravena’s blog post goes into more depth when delving into the key parts of Kubernetes that make it the popular enterprise platform it is today.
Independently managing each node in the cluster is hard work, and we don’t like hard work. Kubernetes is our solution. We need software that makes it easier to run applications on the cluster; without needing to login to each Pi separately and manually running the processes ourselves. Instead Kubernetes is deployed across all of the nodes in the cluster, creating a software defined cluster, where by pool of nodes (our Raspberry Pi’s) known as ‘agents’ are managed by a ‘master’ node and k8s orchestrates workloads between these nodes, centrally, through the master.
Put simply:
- k8s is deployed to a pool of nodes. This pool consists of masters and worker nodes. k8s will assign workloads to the various worker nodes centrally through the master node.
- Scaling out is made easy i.e. Adding more compute nodes to a cluster or tuning a clusters ability to automatically scale horizontally, via pods, is as simple as running a single command from the cli to alter the clusters configuration.
- Highly-available. Highly-availability the ability to be of a cluster to be conitiously operational even in the event of a node failure. If a node were to fail Kubernetes will simply readjust and assign the burden of the failed node across the cluster instead of completely failing as a singular powerful node might. As our cluster only contains one master node, this means it is not fully highly available, if our master node were to fail our cluster nodes would no longer be able to communicate with one another. However, more typical enterprise-scale Kubernetes clusters will have a ‘multi-master’ set up, whereby ensuring that high availablility is fully implemented and there is no single point of failure.
Distributions
As Kubernetes is an open source project, it makes its source code publicly and freely available on GitHub. This means anyone can download, compile and build their own distribution of Kubernetes however, process involves a great deal of time and effort due to the complexity of the source code. As a result, most people turn to a particular Kubernetes distribution to meet their container orchestration needs, as they provide a complete software package with a pre-built version of Kubernetes. These distributions often offer tools to help with setup and installation processes and can be run locally or, as a cloud hosted solution. There are a large range of distributions available. Choosing the right version of Kubernetes depends highly on your use case. Here are a few honourable mentions:
- k8s - Standard Kubernetes (barely runs on Pi’s & CPU will take a huge hit)
- OpenShift (requires 16GB ram and a minimum of 3 master nodes)
- An entprise focused platform-as-a-service offering from RedHat. Designed to provide everything a full-scale company may need to orchestrate containers - enchanced security options and full-time professional support.
- Docker’s KIND
- Originally designed for testing Kubernetes itself but is now often used in local development or continious integration.
- microk8s (lightweight version)
- Powerful, lightweight, reliable production ready k8s distrbution. Enterprise-grade Kubernets distribution with a small diosk and memroy footprint and offers a selection of useful add-ons out straight out the box.
- k0s (NEW extremely lightweight version) - May do another cluster set up using Ubuntu & k0s
- Rancher’s k3s (extremely lightweight version) - Our choice. Comes in at around under 100mbs in size and bundles together some key features: a local storage provider, a service load balancer, a Helm controller and the Traefik ingress controller (more on those later). This makes it a great choice for small devices running on ARM components, such as a Raspberry Pi.
In the following how-to we will focus on k3s, closely following the works of both Jeff and Alex in their various blogs on the matter. In doing so, we are going to use Ansible to help with the automation of our install.
Ansible is an agentless automation tool that by default manages machines over the SSH protocol. In this case, it will automate the deployment of k3s to all the individual nodes through the use of an ansible playbook, saving us from individually installing kubernetes on each individual node. As I am personally more familar with Ansible I find this method of deployment the easiest. But, there are a number of alternative ways in which you can install k3s to the nodes.
- Alex Ellis’ k3sup → Bootstrapping Kubernetes with k3s on Pi (boasts full set up speed of ~1 minute)
How-to deploy Kubernetes to your Pi:
This guide is for newbies (like me) and should be relatively straight forward. If you have any issues, persist and don’t give up! Feel free to drop me a message on any of the platforms in my bio and I’ll give my best attempt at troubleshooting.
Shopping list
- 2 or more Raspberry Pi’s (4 in my case)
- Multi power USB port (more Watts the better)
- USB Type-C Cables (for Raspberry Pi’s)
- 32gb MicroSD cards (make sure you get good ones!)
- Cluster Case (one with fans)
Optional:
- Network Switch with as many ports as you need, remember to have one extra slot for the ethernet-in
- 5 ethernet cables
Other options include:
Total cost for my set up came to around £200, I used Raspberry Pi 4B - 1 x 4GB & 3 x 2GB.
Assembling the cluster
Follow through the Raspberry Pi assembly process for your cluster case. If you have a network switch, connect up the Ethernet cables to your Raspberry Pi’s. Connecting via ethenet allows any data-intensive applciations to exchange instruction without being hampered by wireless LAN or other network traffic, not essential but it is nice. and they should look a little something like this.

Setting up the Operating System
My OS of choice was the official Rasperry Pi OS Lite. A basic version of Raspberry Pi OS with no desktop GUI, ample for running Kubernetes as we won’t be looking at the nodes’ display output.
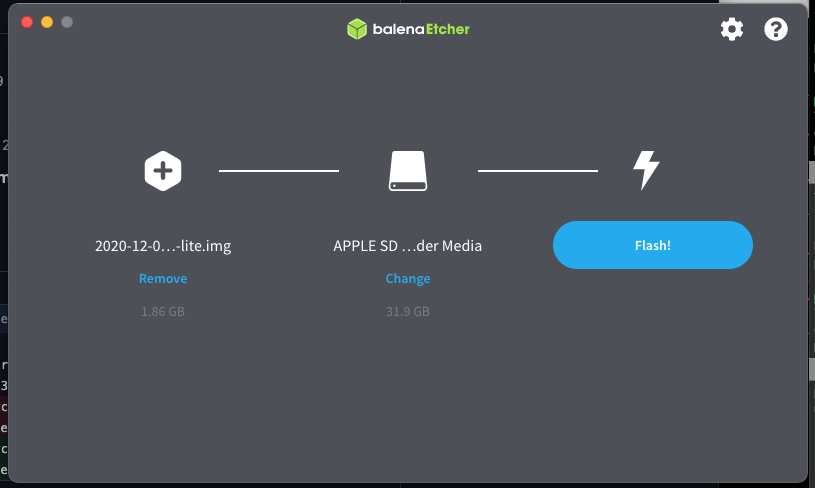
Flashing the OS:
This process can be done via Etcher. Simply plug in your microSD card reader, flash the .zip image file of your chosen OS to the microSD card.
Manual process of flashing your microSD card using CLI:
Once you have inserted your microSD card, verify the disk the card is using on your device, then unmount the disk to prepare for the following command:
diskutil list # lists the volumes
diskutil unmountDisk /dev/disk2 # unmount the microSD
Begin the flashing process:
~/Desktop/Computers/Images/2020-raspios-buster-armhf-lite.img | sudo dd bs=1ms \
of=/dev/rdisk2
The dd utility will directly write the contents of a disk image your microSD card, using a block size of 1mb. When the utility is finished, you will see a boot volume appear on your desktop (or in finder).
Enabling SSH:
Then we need to create an empty ssh file in the boot volume. Simply creating the ssh file will enable ssh on the device, as this is disabled by default:
touch /Volumes/boot/ssh # create a file called ssh in the microSD boot vol
Note: if you don’t have a network switch, now is the time to add your WiFi credentials to the boot volume:
cd /Volumes/boot # change directory into the microSD boot volume
vim wpa_supplicant.conf # create a file called wpa_supplicant.conf and open in vim
Inside vim, paste the following and include your own Network Credentials, make sure to press ‘i’ to enter insert mode (the top 2 lines are only included in the latest version of Raspberry Pi OS):
country=GB # Your 2-digit country code
ctrl_interface=DIR=/var/run/wpa_supplicant GROUP=netdev
network={
    ssid="YOUR_NETWORK_NAME"
    psk="YOUR_PASSWORD"
    key_mgmt=WPA-PSK
}
To exit out of vim press: Esc then :wq and Enter.
Unmount the card one last time and your ready to go..
cd # change back to home dir
diskutil unmountDisk /dev/disk2 # unmount the disk
Or not, this process needs to be repeated for each Raspberry Pi in the cluster.
Finding Raspberry Pi’s on your network
Once all the Pi’s have their subsequent microSD cards flashed, plug them in and power them on, allow them a few minutes to fully boot. Now we need to find them on our network; you can have a look on your router to see any new registered devices and their subsequent IP addresses or install a network scanner - I personally use Angry IP Scanner as seen below, but you are free to use nmap or other networking mapping tools. Scan your network in the range of /24. For instance, my router IP was 192.168.1.1 and I scanned 192.168.1.1/24 to find all the devices on my network. The default Raspberry Pi hostname should be something like raspberrypi.local . Look for the corresponding IP addresses and make note.Locate all the Raspberry Pi’s addresses and make note.

Setting up SSH Keys
Ansible requires a passwordless SSH connection in order to carry out the automated tasks on each node. To set up ssh keys for each of the nodes we can run the following commands individually:
ssh-keygen # generates ssh key on your device, follow process stated
ssh-copy-id pi@<IP-ADDRESS> # copies over your ssh key to the pi's
ssh pi@<IP-ADDRESS> # sshing into the pi
Change the hostname of your Raspbery Pi’s to something more recognisable and relatable to their role in the cluster:
emperor - for master node
worker# - for worker nodes
I would also advise changing your Pi default password to avoid any unwelcome visitors. Take a look at this program built especially for exploiting default credentials on Raspberry Pi’s
sudo nano /etc/hostname # to change hostname
passwd # to change password
Finally.. installing Kubernetes
There are a few prerequisites before installing Kuberentes. We need to install Ansible, Git and kubectl. If you already have them installed, skip this bit.
Both Ansible and Git can be installed using Homebrew. Homebrew is a common package manager for MacOS.
/bin/bash -c "$(curl -fsSL https://raw.githubusercontent.com/Homebrew/install/HEAD/install.sh)"
brew install ansible git
To install kubectl, the cmd line tool that allows you to run commands against your Kubernetes cluster you can follow through the how-to-install guide provided on the Kubernetes website. Its quite self explanatory and easy to follow along. Oh, and if you’re wondering how to pronounce kubectl, you aren’t the only one.
Next, Git clone the repository for k3s-ansible and walk through the usage guide.
git clone https://github.com/k3s-io/k3s-ansible
cd k3s-ansible
cp -R inventory/sample inventory/my-cluster # copies the investory directory from sample
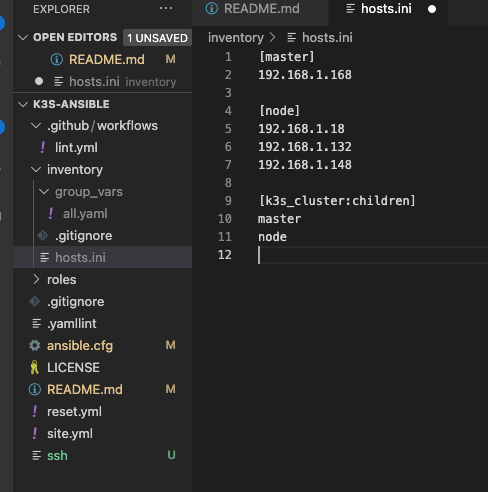
Open up the repository in a text editor and edit the Ansible inventory hosts.ini file to include the IP address of your ‘master’ and ‘worker’ nodes.
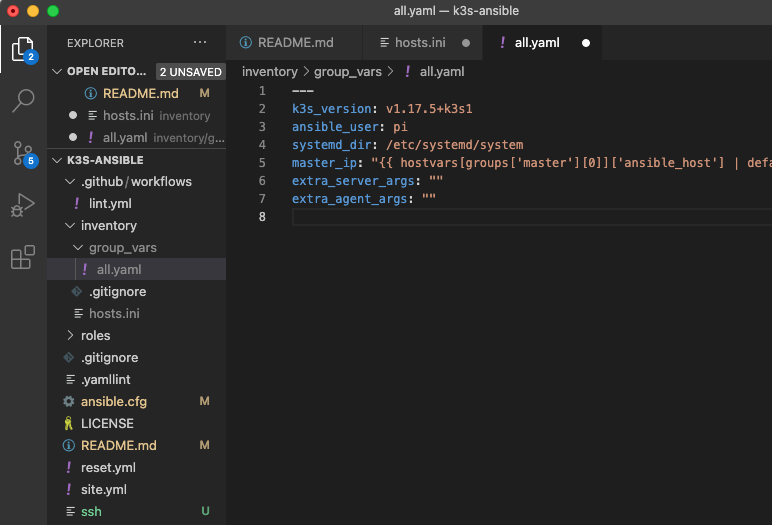
Next, make sure to edit inventory/my-cluster/group_vars/all.yml to match your environment. It should look something like this:
Now run the following command and wait:
ansible-playbook site.yml -i inventory/my-cluster/hosts.ini
Once complete, grab the kubectl configuration from the master node and then set the KUBECONFIG environment variable.
scp pi@<MASTER-IP-ADDRESS>r:~/.kube/config ~/.kube/config-my-cluster # grabs the configuration file from the master node and copies into the host machine
export KUBECONFIG=~/.kube/config-my-cluster # sets KUBECONFIG equal to the config file from the master node
Et Voila! To confirm the installation was successful you can run kubectl get nodes . You’re output should look something like this:
output:
NAME      STATUS   ROLES    AGE     VERSION
emperor   Ready    master   8m16s   v1.17.5+k3s1
worker2   Ready    <none>   7m53s   v1.17.5+k3s1
worker3   Ready    <none>   7m53s   v1.17.5+k3s1
worker1   Ready    <none>   7m50s   v1.17.5+k3s1
Congratulations - you’re now all set up!
If you run kubectl get pods —all-namespaces. You will see all of the pods automatically deployed by k3s. Rancher has chosen to automatically include Traefik, a reverse proxy and load balancer that we can use to direct traffic into our cluster from a single entry point. In future posts, I will be exploring the use of Traefik on Kubernetes through ingress rules. For now, we can power our cluster down using Ansible ansible all -i inventory/hosts.ini -a "shutdown now" -b.
Look forward to the next post, where I will be discussing the importance of monitoring your cluster and walk through deploying a monitoring stack on the k3s cluster we have just created. Stay tuned!